31 December 2015

Cloning An Existing Oracle11g Release 2 (11.2.0.x) RDBMS Installation Using OUI

Cloning An Existing Oracle11g Release 2 (11.2.0.x) RDBMS Installation Using OUI

The source installation is packed up using the "tar" command:

cd /optware/oracle/11.2.0.4
tar -cvf /tmp/db_1.tar

and then moved to the target area(different server) and unpacked:

cd /optware/oracle/11.2.0.4
tar -xvf db_1.tar

cd $ORACLE_HOME/clone/bin
perl clone.pl ORACLE_HOME="" ORACLE_HOME_NAME="" ORACLE_BASE="" OSDBA_GROUP= OSOPER_GROUP=

In my scenario:

cd $ORACLE_HOME/clone/bin
perl clone.pl ORACLE_HOME="/optware/oracle/11.2.0.4/db_1" ORACLE_HOME_NAME="OraHome1" ORACLE_BASE="/optware/oracle" OSDBA_GROUP=dba OSOPER_GROUP=oper


Run the orainstRoot.sh and root.sh scripts as mentioned and you are good to go!!

Confirm the clone by . oraenv, if it prompts for ORACLE_SID.


References:
Cloning An Existing Oracle11g Release 2 (11.2.0.x) RDBMS Installation Using OUI (Doc ID 1221705.1)

02 December 2015

SQL Tuning Advisor

Hello friends,

Delayed blog update!

Worked on SQL Tuning Advisor recently, details as below:

The statements to be analyzed can be retrieved from the Automatic Workload Repository (AWR) or ADDM. Here, I have used the ADDM report to get the SQL statement for the mentioned period of time by the application team.

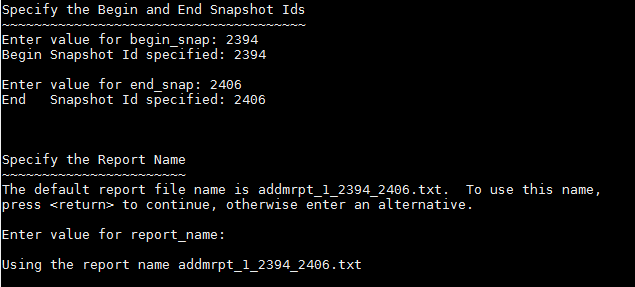
Ran the addmrpt.sql to generate the ADDM report.

SQL> @$ORACLE_HOME/rdbms/admin/addmrpt.sql


For using the SQL tuning advisor, first create a new tuning task using the CREATE_TUNING_TASK function.

SET SERVEROUTPUT ON
DECLARE
  l_sql_tune_task_id  VARCHAR2(100);
BEGIN
  l_sql_tune_task_id := DBMS_SQLTUNE.create_tuning_task (
                          begin_snap  => 2394,
                          end_snap    => 2406,
                          sql_id      => 'dsd586414tchz',
                          scope       => DBMS_SQLTUNE.scope_comprehensive,
                          time_limit  => 60,
                          task_name   => 'dsd586414tchz_AWR_tuning_task',
                          description => 'Tuning task for statement dsd586414tchz in AWR.');
  DBMS_OUTPUT.put_line('l_sql_tune_task_id: ' || l_sql_tune_task_id);
END;
/


With the tuning task created, we now execute it using the EXECUTE_TUNING_TASK procedure.

EXEC DBMS_SQLTUNE.execute_tuning_task(task_name => 'dsd586414tchz_AWR_tuning_task');

The status of the tuning task can be monitored using the DBA_ADVISOR_LOG view.

SELECT task_name, status FROM dba_advisor_log WHERE task_name='dsd586414tchz_AWR_tuning_task';


Once the tuning task has executed successfully the recommendations can be displayed using the REPORT_TUNING_TASK function.

SET LONG 999999999
SET PAGESIZE 500
SET LINESIZE 500
SELECT DBMS_SQLTUNE.report_tuning_task('dsd586414tchz_AWR_tuning_task') AS recommendations FROM dual;


BEGIN
  DBMS_SQLTUNE.drop_tuning_task (task_name => 'dsd586414tchz_AWR_tuning_task');
END;
/

22 November 2015

EXP/IMP

The good old EXP/IMP untility for logical backups.

-- Exports

-- Schema backup on Linux

exp file=/dbwalbkp01/expdp/WALMART_SAV_APP_22Nov2015.dmp log=/dbwalbkp01/expdp/WALMART_SAV_APP_22Nov2015.log compress=Y owner=WALMART_SAV,WALMART_APP

-- Schema backup in windows:

exp file=H:\expbkp\DJO1_DJO2_22Nov2015.dmp log=H:\expbkp\DJO1_DJO2_22Nov2015.log compress=Y owner=DJO1,DJO2

Export: Release 9.2.0.8.0 - Production on Sun Nov 22 03:38:30 2015

Copyright (c) 1982, 2002, Oracle Corporation.  All rights reserved.


Username: sys@savionpr as sysdba
Password:

Connected to: Oracle9i Enterprise Edition Release 9.2.0.8.0 - Production
With the Partitioning, OLAP and Oracle Data Mining options
JServer Release 9.2.0.8.0 - Production
Export done in WE8MSWIN1252 character set and AL16UTF16 NCHAR character set

About to export specified users ...
. exporting pre-schema procedural objects and actions
. exporting foreign function library names for user DJO1
. exporting foreign function library names for user DJO2
. exporting PUBLIC type synonyms
. exporting private type synonyms
. exporting PUBLIC type synonyms
. exporting private type synonyms
. exporting object type definitions for user DJO1
. exporting object type definitions for user DJO2
About to export DJO1's objects ...
. exporting database links
. exporting sequence numbers
. exporting cluster definitions
. about to export DJO1's tables via Conventional Path ...
. . exporting table                              A          0 rows exported
. . exporting table                 ACLAPPLICATION          1 rows exported
. . exporting table          ACLBIZLOGICPERMISSION          3 rows exported
. . exporting table         ACLBIZMANAGEPERMISSION          4 rows exported
. . exporting table          ACLBIZPULSEPERMISSION          1 rows exported


--------------------------------------------------------------------------------------------------------------------------
-- Imports

-- import schema data
imp file=/dbwalbkp01/expdp/WALMART_SAV_APP_22Nov2015.dmp log=/dbwalbkp01/expdp/WALMART_SAV_APP_22Nov2015_import.log GRANTS=N IGNORE=Y INDEXES=N FROMUSER=WALMART_SAV TOUSER=WALMART_SAV

15 November 2015

Changing the DBID and DBNAME of a Database

Changing the DBID and DBNAME of a Database

DBNEWID is a database utility that can change the internal database identifier (DBID) and the database name (DBNAME) for an operational database. I have used the utility to change the DBID and DBNAME separately here.

Change DBID.

Remember your sys password for proceeding with this activity.

Shut the DB and mount it.


invoke the utility.

nid TARGET=SYS

and pass the value Y to change the DBID


Once the utility completes its task of changing the DBID, open the database with RESETLOGS option as mentioned.


Now, here we will change the DBNAME using the utility.

invoke the utility:

nid TARGET=SYS DBNAME=myvs_uat SETNAME=YES


Now, the utility has done its task, we need to edit the pfile and change the DB_NAME, startup with the modified pfile, create spfile from the modified pfile, start the DB with the new spfile. If you don't modify the pfile, you will get the error as below:


Now, go ahead and change the pwd file, by recreating a new one.


Now, you can release the DB to the user.

14 November 2015

RMAN restore status

Hello friends,

Below is the script for estimated time of Backup / Restore via RMAN:

col OPNAME for a28
select OPNAME,SOFAR/TOTALWORK*100 PCT, trunc(TIME_REMAINING/60) MIN_REMAINING,
trunc(ELAPSED_SECONDS/60) MIN_ELAPSED
from v$session_longops where TOTALWORK>0 and OPNAME like '%RMAN%' order by 2;

Output as below:


Few more scripts below:

select sid, start_time, totalwork sofar, (sofar/totalwork) * 100 pct_done from
v$session_longops where totalwork > sofar AND opname NOT LIKE '%aggregate%' AND opname like 'RMAN%';

Output as below:


set lines 300
set pages 50
col client_info for a23
col event for a28
col spid for a5
select sid, spid, client_info, event, p1, p2, p3 from
v$process p, v$session s where p.addr = s.paddr and client_info like 'rman channel=%';

Output as below:


13 November 2015

Oracle® Linux - Pictorial Installation Guide for Release 6

Oracle® Linux - Pictorial Installation Guide for Release 6

Hello friends,

I just did a college project for one of my disciple, so presenting this post about pictorial guide for performing a default installation of Oracle Linux 6.

I installed this OS on a virtual machine.
Softwares used:


  • Oracle Virtual box version 4.3.12, downloaded long time before from (https://www.virtualbox.org/), you can get the latest version now.
  • OEL 6.0, downloaded from (https://edelivery.oracle.com), create a SSO with www.oracle.com

Guide here for:

  • Basic Installation
  • Firewall
  • SELinux

For new VM creation, check the link below:

http://dineshnadar.blogspot.com/2015/11/create-new-oracle-vm-virtualbox.html

Now start the VM, it boots from the DVD iso we assigned as in storage.
Select Install or Upgrade an existing system, or it will boot automatically from the first option, if nothing is selected in 60 secs.


Skip media test, press enter.


Welcome screen, click next.


Select Language and click next.


Select the keyboard. click next


select the storage type, click next


click reinitialize all.


enter domain name and click Configure Network


Click on edit button, connect automatically and click apply, click close.


Click on next to select the time zone, after selecting the time zone, click next.


Enter root password and click next.


click on use all space, and tick mark review and modify partitioning layout, click next.


check the partitions, if any changes required, change and click next.


click format, click write changes to disk.


accept, click next.


select database server, customise now, click next.


select basic requirements, click next.


once installation is complete, click reboot


click forward, accept licence agreement, setup software update NO, forward, create user, forward,


date and time, forward, click finish.


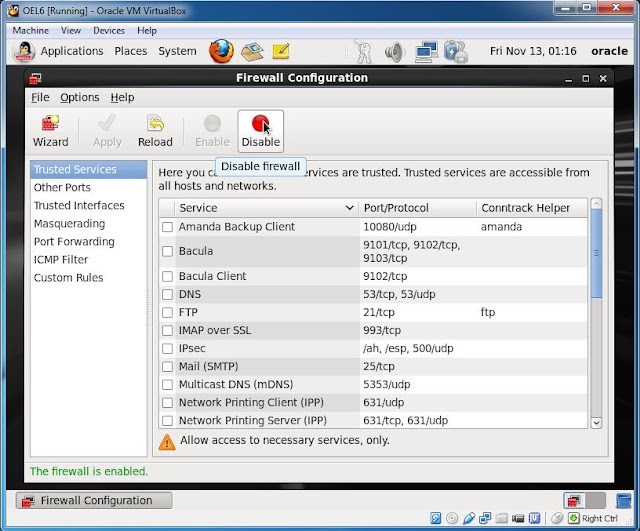
disable firewall.


SELinux

Set SELinux to "permissive" by editing the "/etc/selinux/config" file, making sure the SELINUX flag is set as follows.


SELINUX=permissive


Once the change is complete, either restart the server or run the following command as "root".
setenforce Permissive


For more details, refer : https://docs.oracle.com/cd/E37670_01/E41137/E41137.pdf